м (смысловые правки) |
(начало перевода страницы, старая часть) |
||
| Строка 65: | Строка 65: | ||
Пролистав ниже, увидим группу '''Anti-aliasing'''. Чтобы включить сглаживание, ставим галочку перед надписью '''Anti-aliasing'''. Ниже можно выбрать качество сглаживания ('''5''', '''8''', '''11''' или '''16'''). Я выбираю '''8'''. А дальше все, как обычно — '''F12''' — '''F3''' — сохраняем результат.<br><br>[[Файл:BlenderTutorial (8).png|500px]] |
Пролистав ниже, увидим группу '''Anti-aliasing'''. Чтобы включить сглаживание, ставим галочку перед надписью '''Anti-aliasing'''. Ниже можно выбрать качество сглаживания ('''5''', '''8''', '''11''' или '''16'''). Я выбираю '''8'''. А дальше все, как обычно — '''F12''' — '''F3''' — сохраняем результат.<br><br>[[Файл:BlenderTutorial (8).png|500px]] |
||
| + | |||
| + | {{-}} |
||
| + | <!-- |
||
| + | == Просмотр рендера блоков == |
||
| + | {| class="wikitable" style="float:right;text-align:center;margin:0" |
||
| + | |'''Download'''<br>[https://download.blender.org/release/Blender2.79/ Blender]<br>[https://blockbench.net/downloads Blockbench] |
||
| + | |} |
||
| + | Рендера блоков создаются с помощью программного обеспечения для работы с 3D графикой. Конечно, оно может быть свободно выбрано; очень популярна бесплатная программа [https://www.blender.org Blender] (версия 2.83), которую можно скачать в правой части страницы. Вы создаете только те стороны объекта, которые фактически видны из угла обзора, с которого в конечном итоге производится запись. Фактические модели поэтому всегда выглядят очень странно, но на конечном продукте, представлении для Вики, ничего не заметно. |
||
| + | |||
| + | '''Примечание:''' блоки также могут быть визуализированы с помощью Mineshot, как описано [[#Рендер сущностей|ниже]]. |
||
| + | |||
| + | Шаблоны в этом разделе предназначены только для реальных представлений в плагинах, хотя форма инвентаризации блоков также может быть сгенерирована теоретически, но использует другое освещение, чем задано в шаблонах. Поэтому для отображения инвентарной формы блоков лучше всего просто создать скриншот инвентаря с соответствующим блоком с графическим интерфейсом размером "нормальный", так как он имеет размер 32×32px в качестве стандарта в wiki и должен быть обрезан. |
||
| + | |||
| + | Шаблоны для блендера представлены во всем этом разделе предназначены исключительно для использования в Майнкрафт Вики и лицензированы под [http://creativecommons.org/licenses/by-nc-sa/3.0/deed.en Creative Commons Attribution-NonCommercial-ShareAlike 3.0]. |
||
| + | |||
| + | === Preferences === |
||
| + | Since block views can not be viewed directly in-game, it is particularly important to make them as detailed as possible, so there is no difference compared in-game. In addition, all renders in the whole wiki should be uniform, so that, as they are put in a page, there will be no serious differences in the way the rendering is made. Therefore, there are some special requirements that must be observed when creating block views. All templates provided in this section follow these guidelines, which do not require any further configuration. |
||
| + | *A view angle of 45° and 60° is used for a render, the perspective being aligned to the north-west |
||
| + | *Image size of 300×300px for each display, regardless of the actual size of the block, blank image parts are not cropped |
||
| + | *The block is located exactly in the middle, exceptions apply only to blocks that are part of an animation and therefore need a special position (e.g. [[Flower Pot]] and open [[Fence Gate]]) |
||
| + | *Equal lateral spacing for cubic blocks, horizontal 16px and vertical 2px, for bulky blocks (e.g. [[Rail]] and [[Glass Pane]]), one of the two spacing specifications must be adhered to depending on the respective shape |
||
| + | *Uniform lighting with the exact values as in the game, which is achieved by a proportional reduction of the color values for the three visible blocks (parallel sides use the same values), upper side: 98%, left side: 80% and right side: 60.8% |
||
| + | *No use of [[wikipedia:Anti-aliasing|anti-aliasing]], since it is not applied to individual objects in the game |
||
| + | *No post-processing, and especially, no scaling, since the interpolation used for this purpose is used for anti-aliasing; If the render contains an error, it must be recreated |
||
| + | With a screenshot generated by a mod, these presets would not be achievable reliably, which is why a 3D graphics software is used. |
||
| + | |||
| + | === Cube Blocks === |
||
| + | {| class="wikitable" style="float:right;text-align:center;margin:0" |
||
| + | |'''Download'''<br>Blender 2.79<br>[https://mega.nz/#!vENVwBjK!zwlh4TzSTkO4iQuwJWooTCbVYSnbvavwyZB8yRSF_7M single300px.blend]<br>[https://mega.nz/#!3Mdw2ICD!aEOsfDimByF--RAcplaE6IKtZmb7kbcGdJ7ENPWloro multi300px.blend]<br>Blender 2.8+<br>[https://drive.google.com/uc?id=1N-DHpUxBliUNJ9WADS4VahiSDy2kpEiB single_300px.blend]<br>[https://drive.google.com/uc?id=1BrAP2c9qgovYefUsrwxtrRva16SMmqUw single_transparent300px.blend] |
||
| + | |} |
||
| + | Most blocks have a single texture that is displayed on all six pages. With the corresponding template it is therefore very easy to create a block itself. The required template for creating blocks of dice blocks with Blender can be downloaded at the right side of the page under the name of <code>single300px.blend</code>. |
||
| + | |||
| + | In addition to the dice-shaped blocks, which work with a single basic texture, there are also dice-shaped blocks, which also use different textures on different sides. The template to be used in this case is <code>multi300px.blend</code> which can also be found in the download box on the right side of the page. |
||
| + | |||
| + | After opening, you should note the block appears magenta, because no textures are assigned yet. Everything else is already fully configured, so you don't have to change any settings. To select the texture, an overview of all components of the project can be found in the upper right-hand part of the user interface. Simply select one of the block sides (<code>top</code>, <code>left</code> and <code>right</code>)<sup>(1)</sup>, and then scroll down with the chessboard icon<sup>(2)</sup> in the "Image" section. Then, click on the folder icon<sup>(3)</sup>, which opens a menu for selecting the concrete texture. |
||
| + | |||
| + | [[File:Blockrender Blender1.png|600px]] |
||
| + | |||
| + | In this menu it is now necessary to select the original text of the block. This should, of course, have already been extracted from the standard resources. In an extended field at the top of the menu, the location<sup>(1)</sup> must first be selected, then the individual texture can be clicked in the underlying large field<sup>(2)</sup>. Press "Accept"<sup>(3)</sup> to confirm the selection. If you work with <code>single300px.blend</code>, the texture is automatically applied to all three blocks. However, in the template <code>multi300px.blend</code>, all steps must be repeated for all of the sides of the block. |
||
| + | |||
| + | [[File:Blockrender Blender2.png|600px]] |
||
| + | |||
| + | Since everything is already set, and the necessary textures are stored, the image only needs to be rendered. To do this, click on "Render"<sup>(1)</sup> in the top left of the menu bar and select "Render Image"<sup>(2)</sup>. Alternatively, you can simply press {{key|F12}}. |
||
| + | |||
| + | [[File:Blockrender Blender3.png|600px]] |
||
| + | |||
| + | Now, the "UV/Image Editor" has opened, where the finished render of the image can be seen. It just has to be saved. To do this, click on "Save As Image"<sup>(2)</sup> in the lower left corner under "Image"<sup>(1)</sup>. Alternatively, you can simply press {{key|F3}}. |
||
| + | |||
| + | [[File:Blockrender Blender4.png|600px]] |
||
| + | |||
| + | In the following menu, the location<sup>(1)</sup> and the filename<sup>(2)</sup> have to be filled up, and the process is confirmed with "Save As Image"<sup>(3)</sup>, then the block render will be saved. The result of the example can be seen at the right edge of the screen. The block render can now be [[Special:Upload|uploaded]] to the wiki. |
||
| + | |||
| + | [[File:Acacia Planks JE1 BE1.png|right|150px|thumb|Block render of [[Acacia Planks]] created with ''Blender'']] |
||
| + | [[File:Blockrender Blender5.png|600px]] |
||
| + | |||
| + | === Irregular Blocks === |
||
| + | In addition to the normal blocks with a cube shape, there are also some blocks in the game, which are irregular. However, the templates used so far are only designed for the cubic blocks. For irregular blocks, depending on the shape, different templates are required, all of which have to be specially designed and configured. The table in this section provides various templates for different types of such blocks. |
||
| + | |||
| + | The use is the same as described in the above instructions. Block should use several textures, if necessary, for which page the individual textures can be assigned. If the block is based on only one texture, any page can be selected. Pages of the model which use the same basic texture automatically take over them if they have already been assigned to one of the pages. |
||
| + | |||
| + | {| class="wikitable mw-collapsible mw-collapsed" style="width:100%;text-align:center;table-layout:fixed" |
||
| + | ! rowspan="2" style="width:15%" | Block |
||
| + | ! rowspan="2" | Remarks |
||
| + | ! colspan="2" style="width:25%" | Download |
||
| + | |- |
||
| + | ! Blender 2.79 |
||
| + | ! Blender 2.8+ |
||
| + | |- |
||
| + | | [[Anvil]] |
||
| + | | style="text-align: left;" | The Blender 2.79 model has a wrong rotation and UV mapping. |
||
| + | | [https://mega.nz/#!aVlw1QBD!HH-p1_C2_Aios4p9xBC8722Gt6b4LBbbb81xXjNAM-Y Link] |
||
| + | | [https://drive.google.com/uc?id=1nYyHd86iFJienQdKcDce0WoLvzA9urbo Link] |
||
| + | |- |
||
| + | | Attached [[Attached Melon Stem|melon]] and [[Attached Pumpkin Stem|pumpkin]] stem |
||
| + | | style="text-align: left;" | Textures for 2.79 should be dyed with {{color|#dfc71b}} using [https://codepen.io/pneuma01/full/qBOJmPP this tool]. |
||
| + | | [https://www.mediafire.com/file/1asyxomet5rnfwo/attached_stem300px.blend/file Link] |
||
| + | | [https://www.mediafire.com/file/v742hl6ju06r3vu/attached_stem_2.8.zip/file Link] |
||
| + | |- |
||
| + | | [[Banner]] |
||
| + | | |
||
| + | | [https://www.mediafire.com/file/ixcppl0b5vs55la/Banner_v2.79.zip/file Link] |
||
| + | | [https://www.mediafire.com/file/91d7vb6wsaniv2d/Banner_2.8.zip/file Link] |
||
| + | |- |
||
| + | | [[Beacon]] |
||
| + | | |
||
| + | | [https://drive.google.com/uc?id=1eYwUsm3dXpP3yk8bnUQ_3lsxHiVIaJ03 Link] |
||
| + | | [https://drive.google.com/uc?id=1rk_t8zG8vx88Bj5sFQwfp0Y8kf9REeLQ Link] |
||
| + | |- |
||
| + | | [[Bed]] |
||
| + | | |
||
| + | | ― |
||
| + | | [https://www.mediafire.com/file/m91zo05gydv09mn/Bed.zip/file Link] |
||
| + | |- |
||
| + | | [[Bell]] |
||
| + | | |
||
| + | | [https://drive.google.com/uc?id=1AhHW6XOSOxt6LMxipwnTotsx6zujqzSO Link] |
||
| + | | [https://drive.google.com/uc?id=18QwVi7w1tLCbNTEapzElnWZ78sq6NSd2 Link] |
||
| + | |- |
||
| + | | [[Brewing Stand]] |
||
| + | | |
||
| + | | [https://drive.google.com/uc?id=18pvIWhxYk3MEfAueT9k8N-xdzXcY3ktv Link] |
||
| + | | [https://drive.google.com/uc?id=1RLKwxgPA_4Ns4xid_dEQZ1mtTfvEwmB5 Link] |
||
| + | |- |
||
| + | | [[Button]] |
||
| + | | |
||
| + | | [https://mega.nz/#!DQ0WmSZB!xL4xGKyCGeaJpVXag2-6W1jjX7WEDGi1BntDvPX6wtc Link] |
||
| + | | ― |
||
| + | |- |
||
| + | | [[Cactus]] |
||
| + | | |
||
| + | | [https://drive.google.com/uc?id=1wSZmOsSetEEsyqJmu2MEnbwD4sYtMPTZ Link] |
||
| + | | ― |
||
| + | |- |
||
| + | | [[Easter eggs#Cake|10 Year Cake]] |
||
| + | | |
||
| + | | [https://drive.google.com/uc?id=1_3GgJU52i2k2SgoGs4YyI-U9Q2zaUqwj Link] |
||
| + | | [https://drive.google.com/uc?id=1xiF_Cegr5CaYCq1xG60fuPxOwzqOvdgQ Link] |
||
| + | |- |
||
| + | | [[Cake]] |
||
| + | | |
||
| + | | [https://drive.google.com/uc?id=1c6ww6a0j1qlaoap9gEtVG0SPqktKfQFY Link] |
||
| + | | [https://drive.google.com/uc?id=1hGs0mjaXPDgWL9TMJZQ7iVOjJb9vt-xv Link] |
||
| + | |- |
||
| + | | [[Campfire]] |
||
| + | | |
||
| + | | [https://www.mediafire.com/file/aajy8e1xeicdryr/Campfire_v2.79.zip/file Link] |
||
| + | | ― |
||
| + | |- |
||
| + | | [[Cauldron]] |
||
| + | | style="text-align: left;" | In Blender 2.8+, the Water tint is configureable |
||
| + | | [https://www.mediafire.com/file/0mczk20p6rlgr0q/Cauldron_2.79.zip/file Link] |
||
| + | | [https://www.mediafire.com/file/6astuueodi610fn/Cauldron_2.8.zip/file Link] |
||
| + | |- |
||
| + | | [[Chain]] |
||
| + | | |
||
| + | | [https://www.mediafire.com/file/px58zbqwe6s61iy/chain300px.blend Link] |
||
| + | | ― |
||
| + | |- |
||
| + | | [[Chest]] |
||
| + | | |
||
| + | | [https://drive.google.com/uc?id=11BEzMM9nVGV5jPxjSqDIishn3-voCskL Link] |
||
| + | | ― |
||
| + | |- |
||
| + | | Double [[Chest]] |
||
| + | | |
||
| + | | [https://drive.google.com/uc?id=13NG7CmNW1DjNVAGxueif4IXhSmS3okyA Link] |
||
| + | | ― |
||
| + | |- |
||
| + | | [[Cocoa]] |
||
| + | | |
||
| + | | [https://drive.google.com/uc?id=1eimTSZStP-YSKR1kI90xqcMzuMPNb0Pz Link] |
||
| + | | ― |
||
| + | |- |
||
| + | | [[Comparator]]<br>(Normal) |
||
| + | | |
||
| + | | [https://www.mediafire.com/file/l735c8fhhrm69r4/comparator.blend/file Link] |
||
| + | | rowspan="2" | [https://drive.google.com/uc?id=1UOXbzBaR-Plcv4PGUay_sAR059loiVxq Link] |
||
| + | |- |
||
| + | | [[Comparator]]<br>(Subtracking) |
||
| + | | |
||
| + | | [https://www.mediafire.com/file/i93egbe8xppq91e/subtracking_comparator.blend/file Link] |
||
| + | |- |
||
| + | | [[Composter]] |
||
| + | | |
||
| + | | [https://www.mediafire.com/file/u62ltaf62vpc97n/composter300px.blend Link] |
||
| + | | [https://drive.google.com/uc?id=1YoaRMpJULh2f7o8uGYDxYjyreiWhgZFp Link] |
||
| + | |- |
||
| + | | [[Conduit]] |
||
| + | | |
||
| + | | [http://www.mediafire.com/file/aali7bdrrt3t031/conduit_active300px.blend Link] |
||
| + | | [https://www.mediafire.com/file/0l43plmv16zkesx/Conduit.zip/file Link] |
||
| + | |- |
||
| + | | [[Coral Fan]] |
||
| + | | |
||
| + | | [https://drive.google.com/uc?id=1z3ZHeJ3P2ILFlZwHs2o1nxXSajbR1yF7 Link] |
||
| + | | ― |
||
| + | |- |
||
| + | | [[Coral Wall Fan]] |
||
| + | | |
||
| + | | [https://drive.google.com/uc?id=18-RuAcgkCGP0BMqVIaI2NS5p6De-pJXM Link] |
||
| + | | ― |
||
| + | |- |
||
| + | | [[Chorus Flower]] and [[Chorus Plant]] |
||
| + | | |
||
| + | | ― |
||
| + | | [https://www.mediafire.com/file/93echpejzzqbap2/Chorus.zip/file Link] |
||
| + | |- |
||
| + | | [[Crops]] |
||
| + | | style="text-align: left;" | Not suitable for [[pumpkin stem]] and [[melon stem]]s |
||
| + | | [https://mega.nz/#!TZ00hCDA!KZqgbSVVMZAv-yy9duYANpwRVc_XehyqZqJ2DDU2EXM Link] |
||
| + | | ― |
||
| + | |- |
||
| + | | [[Daylight Detector]] |
||
| + | | |
||
| + | | ― |
||
| + | | [https://www.mediafire.com/file/cvao8aubqizlwrg/daylight_detector_2.8.zip/file Link] |
||
| + | |- |
||
| + | | [[Door]] |
||
| + | | |
||
| + | | ― |
||
| + | | [https://www.mediafire.com/file/39ta9aokov87sa7/Door.zip/file Link] |
||
| + | |- |
||
| + | | [[Dragon Egg]] |
||
| + | | |
||
| + | | [https://drive.google.com/uc?id=1zAZBKj7fGJzQk-LPJlRrg2aOhZvlndp7 Link] |
||
| + | | [https://drive.google.com/uc?id=1MtpOuL0s0qYlv1EKg3U-lrriCaW0uFED Link] |
||
| + | |- |
||
| + | | [[Enchanting Table]] |
||
| + | | |
||
| + | | [https://www.mediafire.com/file/snojvso9svc0lrj/enchanting_table300px_v2.79.blend/file Link] |
||
| + | | [https://www.mediafire.com/file/4drlq5i4hcxneh6/Enchanting_table.zip/file Link] |
||
| + | |- |
||
| + | | [[End Rod]] |
||
| + | | |
||
| + | | ― |
||
| + | | [https://www.mediafire.com/file/3czx1p03tt4g04j/end_rod_2.8.zip/file Link] |
||
| + | |- |
||
| + | | [[End Portal Frame]] |
||
| + | | |
||
| + | | [https://drive.google.com/uc?id=10E_W1yOLvLz6Bnvaj7d-weZoVh9f0L3y Link] |
||
| + | | [https://drive.google.com/uc?id=1j5ejIq4VC-sq2eSlFzwuVVXRTfd8LYv9 Link] |
||
| + | |- |
||
| + | | [[Fence]] |
||
| + | | |
||
| + | | [https://mega.nz/#!jMUCnS7A!F06Tsf8O66a1fxhIG3tfVlpfErBw0skhXokivTxJ9lQ Link] |
||
| + | | [https://drive.google.com/uc?id=1TCR8VfOtCue3AD44JaRHUzbjqFA8xGmE Link] |
||
| + | |- |
||
| + | | [[Fence Gate]] |
||
| + | | |
||
| + | | [https://drive.google.com/uc?id=1XWlJtB6E5323L3AdOvEDGLPlQMPHv0wB Link] |
||
| + | | ― |
||
| + | |- |
||
| + | | [[Fire]] |
||
| + | | |
||
| + | | [https://www.mediafire.com/file/pqgqisswllg28rv/fire300px_2.79.blend/file Link] |
||
| + | | [https://www.mediafire.com/file/jh3zlmz5vaua1hn/fire300px_2.8.blend/file Link] |
||
| + | |- |
||
| + | | [[Flower]] |
||
| + | | |
||
| + | | [https://drive.google.com/uc?id=1qpeTY5URgBOEtLtiyJ2jDtn8xCpEEXDw Link] |
||
| + | | ― |
||
| + | |- |
||
| + | | [[Flower Pot]] |
||
| + | | style="text-align: left;" | |
||
| + | * Assigning the texture for the flower pot body (<code>flower_pot.png</code>) is done with "top" |
||
| + | * Assigning the texture for the soil in the pot (<code>dirt.png</code>) is done with "top.001" |
||
| + | * Assigning the texture for the plant is at "angle"; can be empty for an empty flower pot |
||
| + | * Not suitable for [[cactus]] |
||
| + | | [https://mega.nz/#!yUESSD4L!bGyaVf0PIeiAfBIYC6f-DM8SNt7lAEEL9bQT7Zc1g2s Link] |
||
| + | | ― |
||
| + | |- |
||
| + | | [[Flower Pot]] for Cactus |
||
| + | | style="text-align: left;" | |
||
| + | * Assigning the texture for the flower pot body (<code>flower_pot.png</code>) is done with "top" |
||
| + | * Assigning the texture for the cactus (<code>cactus_side.png</code>) is done with "top.001" |
||
| + | | [https://mega.nz/#!ydczQQgY!7AbeT-q-Igra9vZ7Y1mU_V2JMMS4Oilp1o2IO2agUU0 Link] |
||
| + | | ― |
||
| + | |- |
||
| + | | [[Glass Pane]] |
||
| + | | style="text-align: left;" | |
||
| + | * Assigning the texture for the bottom (<code>glass_xxx.png</code>) is done with "left" |
||
| + | * Assigning the texture for the top (<code>glass_pane_top_xxx.png</code>) is done with "right" |
||
| + | * Not suitable for [[iron bars]] |
||
| + | | [https://mega.nz/#!uUEQyISC!Bgn7TBAyMgpDYHhFW5l8teGW-s9I26W1zSSRMW542SQ Link] |
||
| + | | [https://drive.google.com/uc?id=15T7nUFJ9YZML1_qJD8RwE0WWNewNqjAJ Link] |
||
| + | |- |
||
| + | | [[Grindstone]] |
||
| + | | |
||
| + | | [http://www.mediafire.com/file/8a933428ba3guhe/grindstone300px.blend/file Link] |
||
| + | | [https://drive.google.com/uc?id=1QESzl96CeokF_WlPEAkgn0fOqvSfAs3- Link] |
||
| + | |- |
||
| + | | [[Head]](Including Dragon Head) |
||
| + | | |
||
| + | | ― |
||
| + | | [https://www.mediafire.com/file/iqe2q2gfd70b83e/Head.zip/file Link] |
||
| + | |- |
||
| + | | [[Honey Block]] |
||
| + | | |
||
| + | | [https://www.mediafire.com/file/h1yg489grqtwchq/honey_block300px.blend Link] |
||
| + | | [https://drive.google.com/uc?id=1W910-3vGkYbbLPmX47REcER5b9sJwkBJ Link] |
||
| + | |- |
||
| + | | [[Hopper]] |
||
| + | | |
||
| + | | [https://drive.google.com/uc?id=1PyybCR4MLuicnCaieQcK-SZs-jCKKCft Link] |
||
| + | | [https://drive.google.com/uc?id=1JZJcJ1Qlae4ixjyuLzkAImJ0DUr0yXbK Link] |
||
| + | |- |
||
| + | | [[Iron Bars]] |
||
| + | | |
||
| + | | [https://drive.google.com/uc?id=1uxuYVc8Qesc74BXTOHrLmWV_axFspmMl Link] |
||
| + | | ― |
||
| + | |- |
||
| + | | [[Item Frame]] |
||
| + | | |
||
| + | | [https://drive.google.com/uc?id=1CSXlmu94mJvIrbGfEcSm5bs5QHPDijdD Link] |
||
| + | | ― |
||
| + | |- |
||
| + | | [[Item Frame]] for Maps |
||
| + | | |
||
| + | | [http://www.mediafire.com/file/9wfkn4i4rypuwl8/item_frame300px.blend/file Link] |
||
| + | | ― |
||
| + | |- |
||
| + | | [[Lantern]] |
||
| + | | |
||
| + | | [http://www.mediafire.com/file/lkbsin5c1mdegpb/lantern300px.blend Link] |
||
| + | | ― |
||
| + | |- |
||
| + | | [[Lava]] |
||
| + | | |
||
| + | | ― |
||
| + | | [https://www.mediafire.com/file/9zz76g7x1saocis/Lava_2.8.zip/file Link] |
||
| + | |- |
||
| + | | [[Lectern]] |
||
| + | | |
||
| + | | [https://mega.nz/file/fUBCTKiC#0S52cLV5ki4Av3IQLhHnn7jDzQx7jSetqprGzeSww7A Link] |
||
| + | | [https://drive.google.com/uc?id=1QJ68R2u5p3kw62vRC6S3SdPPRNiZmgT8 Link] |
||
| + | |- |
||
| + | | [[Lectern]] with Book |
||
| + | | |
||
| + | | [https://www.mediafire.com/file/tx0dzrc5hzm23vf/Lectern300px.blend/file Link] |
||
| + | | ― |
||
| + | |- |
||
| + | | [[Lever]] |
||
| + | | |
||
| + | | [http://www.mediafire.com/file/bx4zol8un1g0gk9/lever300px.blend Link] |
||
| + | | ― |
||
| + | |- |
||
| + | | [[Nether Portal (block)]] |
||
| + | | |
||
| + | | ― |
||
| + | | [https://www.mediafire.com/file/lhh154t48mewfpj/Nether_Portal_Block.zip/file Link] |
||
| + | |- |
||
| + | | [[Painting]] |
||
| + | | |
||
| + | | [https://drive.google.com/uc?id=1NiXw2n3XwCr-rPwlFLLAl91NzKE2FB1s Link] |
||
| + | | ― |
||
| + | |- |
||
| + | | [[Piston]] |
||
| + | | |
||
| + | | [https://www.mediafire.com/file/0y3ta4f7qszstr0/piston.blend Link] |
||
| + | | ― |
||
| + | |- |
||
| + | | [[Piston]] Mod |
||
| + | | |
||
| + | | ― |
||
| + | | [https://drive.google.com/uc?id=1O32kvbJhg3kgkcihWDim54cJMBmGK7YM Link] |
||
| + | |- |
||
| + | | [[Piston Head]] |
||
| + | | |
||
| + | | [https://drive.google.com/uc?id=1V8D_RuRWZM2gF4tymGoGFAD_8egajnKk Link] |
||
| + | | ― |
||
| + | |- |
||
| + | | [[Pressure Plate]] |
||
| + | | style="text-align: left;" | Inactive |
||
| + | | [https://mega.nz/#!eNVnTIRB!UMg6JwY644rh7DW_UkJFBvYvReA3ILhIfETrFgV6Ba4 Link] |
||
| + | | ― |
||
| + | |- |
||
| + | | Normal [[Repeater]] |
||
| + | | |
||
| + | | [https://www.mediafire.com/file/wb0wd2zq18esstt/repeater.blend/file Link] |
||
| + | | ― |
||
| + | |- |
||
| + | | Locked [[Repeater]] |
||
| + | | |
||
| + | | [https://www.mediafire.com/file/nihmo7s83ry8za2/repeater_locked.blend/file Link] |
||
| + | | ― |
||
| + | |- |
||
| + | | [[Sea Pickle]] |
||
| + | | |
||
| + | | [http://www.mediafire.com/file/16a1ejj33m82c4q/sea_pickles300px.blend Link] |
||
| + | | ― |
||
| + | |- |
||
| + | | [[Scaffolding]] |
||
| + | | |
||
| + | | [https://www.mediafire.com/file/24mi8b2xy7alvho/Scaffolding_v2.79.zip/file Link] |
||
| + | | [https://drive.google.com/uc?id=1FPZFfn2gajmTx9e7dAmG60ej05A7MOq7 Link] |
||
| + | |- |
||
| + | | [[Shulker]] |
||
| + | | |
||
| + | | [https://drive.google.com/uc?id=1B0cFleb_w66PycZhWi_EOcf1hdzt9fwY Link] |
||
| + | | ― |
||
| + | |- |
||
| + | | [[Sign]] |
||
| + | | |
||
| + | | [https://www.mediafire.com/file/nlbe2bgqlxes05z/sign400px.blend Link] |
||
| + | | ― |
||
| + | |- |
||
| + | | [[Slab]] |
||
| + | | |
||
| + | | [https://mega.nz/#!nFM31AJK!4V4kei60zAghXkywgIOm7I8DR5MrRjGshtTBuhm5YHc Link] |
||
| + | | [https://drive.google.com/uc?id=19YQXrfnCz9dz9C8LgTbcDt3407Zfpjdw Link] |
||
| + | |- |
||
| + | | [[Slime Block]] |
||
| + | | |
||
| + | | [https://drive.google.com/uc?id=1thQkPp5ZVFq03OLXT0tb_d0flO4v073q Link] |
||
| + | | [https://drive.google.com/uc?id=1zPwgWRX4-M57x0_wcTpwJYsBg4yNIRr- Link] |
||
| + | |- |
||
| + | | [[Stairs]] |
||
| + | | |
||
| + | | [https://mega.nz/#!mFcU0LxL!jxNY1vzX5lf0Th3yN81N8SbQkYEFfFujffEQGpoLYmY Link] |
||
| + | | [https://drive.google.com/uc?id=1q61WnNWH-e17OBI0k15GvrH69Tc1J_eV Link] |
||
| + | |- |
||
| + | | [[Pumpkin Seeds|Pumpkin]] and [[Melon Seeds|Melon]]<br> stems(all growth stages) |
||
| + | | |
||
| + | | ― |
||
| + | | [https://www.mediafire.com/file/onx2qo6vt8nh3x0/stem_2.8.zip/file Link] |
||
| + | |- |
||
| + | | [[Stonecutter]] |
||
| + | | |
||
| + | | [http://www.mediafire.com/file/yraccyazygkhd8e/stone_cutter300px.blend Link] |
||
| + | | [https://drive.google.com/uc?id=1lyc_WUL8TSN2etBp4iyC1LhBYm6dRfQY Link] |
||
| + | |- |
||
| + | | [[Trapdoor]] |
||
| + | | |
||
| + | | [https://mega.nz/#!3INWVYwS!uEUE30H_G3vTA3Hu-NqyZgsZHfeTJXuD9_wMyNY6a5U Link] |
||
| + | | ― |
||
| + | |- |
||
| + | | [[Tripwire Hook]] |
||
| + | | style="text-align: left;" | Included unattached, attached On/Off and the old unattached model. |
||
| + | | [https://www.mediafire.com/file/9odwodk21xuptu8/tripwire_hook300px.blend Link] |
||
| + | | ― |
||
| + | |- |
||
| + | | [[Turtle Egg]] |
||
| + | | |
||
| + | | [https://mega.nz/#!7QsRAQDL!6jhWzziH4gSyJJPQtmJl4gNJTCwMN6p9tLR0gWI4usM Link] |
||
| + | | ― |
||
| + | |- |
||
| + | | [[Ladder]]<br>[[Vine]] |
||
| + | | |
||
| + | | [https://drive.google.com/uc?id=1Ibm_PWeu4umM-yBTITATICcQC9O2-93r Link] |
||
| + | | [https://www.mediafire.com/file/6ip9p4webh4dmwj/Ladder_and_Vine_2.8.zip/file Link] |
||
| + | |- |
||
| + | | [[Torch]]<br>[[Redstone Torch]] |
||
| + | | |
||
| + | | [http://www.mediafire.com/file/vt5csdq6xfsfwm3/torch300px.blend/file Link] |
||
| + | | [https://www.mediafire.com/file/rwo7ac2yfz5fzfa/Torch_2.8.zip/file Link] |
||
| + | |- |
||
| + | | [[Wall]] |
||
| + | | |
||
| + | | ― |
||
| + | | [https://www.mediafire.com/file/y3ghvllx9tpv0y6/Wall.zip/file Link] |
||
| + | |- |
||
| + | | [[Water]] |
||
| + | | style="text-align: left;" | To change the color tint, change second color entry in every material |
||
| + | | ― |
||
| + | | [https://www.mediafire.com/file/7ynww2ym6102q8l/Water.zip/file Link] |
||
| + | |- |
||
| + | |} |
||
| + | |||
| + | === Troubleshooting === |
||
| + | It may happen that after the rendering in the final image, which is shown in the "UV/Image Editor", missing textures or minor errors such as a wrongly turned texture are noticeable. These two errors are discussed in this section. |
||
| + | |||
| + | In some cases, if textures that are used by multiple blocks at the same time, Blender can not update them all the time, the texture for a page should be changed. This is merely a charging fault, which occurs irregularly. It can easily be fixed by selecting the corresponding block page at the top right of the element selection<sup>(1)</sup>, and the text-specific settings tab with the chessboard icon<sup>(2)</sup> will move to the section "Image". Just click on the reload icon<sup>(3)</sup> and the texture is loaded correctly. |
||
| + | |||
| + | [[File:Blockrender Blender6.png|600px]] |
||
| + | |||
| + | By re-rendering the block via the corresponding menu or by pressing {{key|F12}}, the corresponding side is also displayed in the image with the correct texture. If other sides are affected, the process must also be carried out for them. |
||
| + | |||
| + | [[File:Blockrender Blender7.png|600px]] |
||
| + | |||
| + | When using the template <code>multi300px.blend</code>, the final image should always be checked for its accuracy. Since blocks with several textures in the game, use entirely their own block models, so the textures in their rotation and reflection sometimes behave differently than in normal blocks. The used template for Blender can not cover each of these individual cases, but is only designed for the standard model. Individual deviations must be optimized manually. |
||
| + | |||
| + | In the example, the finished image shows that an error has occurred on the top of the block: the texture is mirrored, the brighter edge of the arrow should be on the right and not on the left side. As the finished render and block in the game are not to be distinguished at all, it is important to fix even a small error. To do this, the top of the block must first be selected<sup>(1)</sup>, and the mirroring must then be made in the texture settings<sup>(2)</sup>. In the "Mapping" section, this is the simplest way to change the sign of the X, Y, and Z values under "Size". In the example, a mirroring on the X axis is necessary, so the sign of the X value is changed<sup>(3)</sup>. |
||
| + | |||
| + | [[File:Blockrender Blender8.png|600px]] |
||
| + | |||
| + | By re-rendering the block via the corresponding menu or by pressing {{key|F12}}, the error is fixed as seen in the picture. This can now be saved as usual. |
||
| + | |||
| + | [[File:Blockrender Blender9.png|600px]] |
||
| + | |||
| + | === Using Blockbench === |
||
| + | |||
| + | Another software you can use is [https://blockbench.net Blockbench (Blockbench.net)]. This software has the advantage of being able to use the actual block models from the [[client.jar]]. You can also render custom block models. Blockbench has an [https://blockbench.net/web Online version] that works identically. |
||
| + | |||
| + | You can also export models into obj files to be used in Blender afterwards. |
||
| + | |||
| + | ; Inside BlockBench |
||
| + | You first have to import the model by going to File -> Import -> Add Model and select the file you want to import. After that right click inside the preview window and select Perspective -> North. Then press {{key|Ctrl+Shift+I}} and open the console tab. In the console, enter <code>main_preview.camOrtho.position.set(1, 6**.5/3, 1)</code>, if the model clipping through the camera, multiply each coordinate components with the preferred distance, e.g: <code>(1*20, 6**.5/3*20, 1*20)</code>. For scaling you can enter <code>main_preview.camOrtho.scale.set(''xScale'', ''yScale'', ''zScale'')</code> in the console. Lastly to capture the screenshot, right click in the preview window then select Screenshot. |
||
| + | |||
| + | As of version 3.5.2 camera view can be set easily by right clicking in blank space and from '''Angles''' select '''Isometric right'''. |
||
| + | |||
| + | === Blockbench Troubleshooting === |
||
| + | |||
| + | Since the default block is not in the client.jar, you have to hit the square with the plus (which creates a new cube) and resize your new cube to 16x16x16 and assign the textures by clicking Add Texture, selecting a file, clicking a face, and dragging the appropriate texture to the face. Do this every time you want to add a texture. |
||
| + | |||
| + | For stairs and slabs, it will just provide blank textures with red exclamation points. Just right click these blank and hit Change File to change the file. |
||
| + | |||
| + | If you need to rotate a face, go back to the block model, click the face, and find a slider under the new magnified picture of the texture you used and move it until you get it the way you want. |
||
| + | |||
| + | == Рендер сущностей == |
||
| + | {| class="wikitable" style="float:right;text-align:center;margin:0" |
||
| + | |'''Downloads''' |
||
| + | [https://github.com/ata4/mineshot/releases Mineshot]<br>[https://www.gimp.org/downloads/ GIMP] |
||
| + | |} |
||
| + | Although standard renders of [[entity|entities]] can also be created using a 3D graphics software, it is not recommended to use one. It is extremely difficult to reproduce the correct model, as each entity has different sizes and models. However, other entities, such as [[shulker]]s, are cube-shaped, so Blender can be used to render one. In addition to the workload, lighting is the real problem. [[Light]] behaves in ''Minecraft'' very differently, and the exact behavior in the environment of a 3D graphics software is extremely difficult and in most cases not exactly possible to reproduce. |
||
| + | |||
| + | In this case, instead of a 3D graphics software, mods are instead used. ''Mineshot'', created by a former editor of the wiki, [[User:BarracudaATA|BarracudaATA]], is the best mod which can be used to render entities. |
||
| + | {{Expand list}} |
||
| + | {| class="wikitable mw-collapsible mw-collapsed" style="width:100%;text-align:center;table-layout:fixed" |
||
| + | !style="width:15%"|Entity |
||
| + | !Remarks |
||
| + | !style="width:25%"|Download |
||
| + | |- |
||
| + | |rowspan=2|[[Rabbit]] |
||
| + | |style="text-align:left"| |
||
| + | *Normal variant |
||
| + | |[https://www.mediafire.com/file/gxbs3sv6beg52ph/Rabbit.blend/file Rabbit.blend] |
||
| + | |- |
||
| + | |style="text-align:left"| |
||
| + | *Baby variant |
||
| + | |[https://www.mediafire.com/file/ijr2sesxalsx90f/Baby_Rabbit.blend/file Baby_Rabbit.blend] |
||
| + | |- |
||
| + | |[[Iron Golem]] |
||
| + | |style="text-align:left"| |
||
| + | |[https://www.mediafire.com/file/l6mts9iphbba02e/Iron_Golem.blend/file Iron_Golem.blend] |
||
| + | |- |
||
| + | |[[Player]] |
||
| + | |style="text-align:left"| |
||
| + | *Supports second layer |
||
| + | *Blender 2.8+ |
||
| + | |[https://www.mediafire.com/file/7uwqepz2zn97vfl/Player.zip/file Player.zip] |
||
| + | |- |
||
| + | |[[Elytra]] |
||
| + | |style="text-align:left"| |
||
| + | *Blender 2.79 |
||
| + | |[https://www.mediafire.com/file/z2ovyu1hfvqusba/elytra.blend elytra.blend] |
||
| + | |- |
||
| + | |[[Spider]] |
||
| + | |style="text-align:left"| |
||
| + | *Emissive red eyes |
||
| + | *Blender 2.79 |
||
| + | |[https://www.mediafire.com/file/wcdqyklby2wzvui/Spider.blend Spider.blend] |
||
| + | |- |
||
| + | |[[Boat]] |
||
| + | |style="text-align:left"| |
||
| + | *Blender 2.79 |
||
| + | |[https://www.mediafire.com/file/rn5cn321xwtlcxy/boat.blend boat.blend] |
||
| + | |- |
||
| + | |[[End Crystal]] |
||
| + | |style="text-align:left"| |
||
| + | *Blender 2.79 |
||
| + | |[http://www.mediafire.com/file/hx6ge0ies6p808o/end_crystal.blend end_crystal.blend] |
||
| + | |- |
||
| + | |[[Witch]] |
||
| + | |style="text-align:left"| |
||
| + | *Blender 2.79 |
||
| + | |[https://www.mediafire.com/file/x7qc0dvexunvpn2/witch.blend witch.blend] |
||
| + | |- |
||
| + | |[[Zombie Villager]] |
||
| + | |style="text-align:left"| |
||
| + | *Blender 2.79 |
||
| + | To use it, create a texture that merges "type" (plains, snowy etc ..), "profession" and "profession_level" layers on the "zombie_villager.png". If this is a profession wearing a hat (see ".mcmeta" and that have "full" or "half"), remove the hat part of the type texture. |
||
| + | |[https://www.mediafire.com/file/651bbypblqk1wcb/zombie_villager.blend zombie_villager.blend] |
||
| + | |- |
||
| + | |[[Ghast]] |
||
| + | |style="text-align:left"| |
||
| + | *Blender 2.79 |
||
| + | |[http://www.mediafire.com/file/3fk5jbh2krcluy6/ghast.blend/file ghast.blend] |
||
| + | |- |
||
| + | |[[Blaze]] |
||
| + | |style="text-align:left"| |
||
| + | *Blender 2.79 |
||
| + | *Particles |
||
| + | |[https://www.mediafire.com/file/ymgk4gp7z9zg0a5/blaze.blend blaze.blend] |
||
| + | |- |
||
| + | |rowspan=3|[[Armor Stand]] |
||
| + | |style="text-align:left"| |
||
| + | * Java edition armor model |
||
| + | |[http://www.mediafire.com/file/d96hgxyylze0di5/armor_stand_je.blend/file armor_stand_je.blend] |
||
| + | |- |
||
| + | |style="text-align:left"| |
||
| + | * Bedrock edition armor model |
||
| + | |[http://www.mediafire.com/file/u7420a1puiy4ii0/armor_stand_be.blend/file armor_stand_be.blend] |
||
| + | |- |
||
| + | |style="text-align:left"| |
||
| + | * Bedrock edition all poses |
||
| + | |[http://www.mediafire.com/file/4vvg1hkg5eyj5j3/armor_stand_poses.blend/file armor_stand_poses.blend] |
||
| + | |- |
||
| + | |[[Guardian]] |
||
| + | |style="text-align:left"| |
||
| + | * Blender 2.79 |
||
| + | |[https://www.mediafire.com/file/y2os809g0rkmxof/guardian.blend/file guardian.blend] |
||
| + | |- |
||
| + | |rowspan=3|[[Cow]] |
||
| + | |style="text-align:left"| |
||
| + | * Adult variant. Included the mooshroom back's mushrooms. Blender 2.79 |
||
| + | |[http://www.mediafire.com/file/gxhp4bts7h80ik6/cow.blend/file cow.blend] |
||
| + | |- |
||
| + | |style="text-align:left"| |
||
| + | * Baby variant. New model (JE 1.15) Blender 2.79 |
||
| + | |[http://www.mediafire.com/file/nlhcpj47d2u3fno/baby_cow.blend/file baby_cow.blend] |
||
| + | |- |
||
| + | |style="text-align:left"| |
||
| + | * Baby variant. Bedrock/Java old model Blender 2.79 |
||
| + | |[http://www.mediafire.com/file/eo866bxn3p8qun6/baby_cow_old.blend/file baby_cow_old.blend] |
||
| + | |- |
||
| + | |[[Villager]] |
||
| + | |style="text-align:left"| |
||
| + | * Blender 2.8+<br> |
||
| + | * Supports default Minecraft layer textures of proffesion, type and proffesion level |
||
| + | |[https://www.mediafire.com/file/mjvgx4iz75d6h7t/Villager.zip/file Villager.zip] |
||
| + | |} |
||
| + | |||
| + | === Non-animated Entities === |
||
| + | [[File:White Llama.png|right|150px|thumb|Render of a [[Llama]] entity using ''Mineshot'']] |
||
| + | After ''Mineshot'' has been installed, it can be started. Before recording, a suitable environment must first be created. Since the presentation in its final version should contain a transparent background, it is best to work with a monochrome background. Green screens or blue screens made of concrete blocks or specially textured blocks which are already very helpful, but since the lighting of ''Minecraft'' also colors different blocks with the same texture, an even simpler background should be chosen: the sky. It is recommended to create a [[superflat]] world with the preset "The Void". The sky is divided into two halves colored in a different blue tone, but these can also be standardized with the additional mod called [https://optifine.net/home ''OptiFine'']. Furthermore, [[Barrier]] blocks are best suited for the floor, since they are invisible. |
||
| + | |||
| + | Now the environment is set, only the entity has to be spawned and then the recording can be done. It is important to summon an entity with the data tag of <code>NoAI:1</code> so that it does not rotate or move. |
||
| + | |||
| + | To start recording, a special camera mode is switched on in Mineshot. This is done by pressing the default key {{key|NUMPAD5}}, which can be zoomed in and out by pressing {{key|ADD}} and {{key|SUBTRACT}} respectively, both of which can be found at the number keypad. Do not change the angle of the camera. The default values (45° and 60°) correspond exactly to the values required for the standard view. |
||
| + | |||
| + | The camera is centered on the player's position, but is only rendered by the game when it is not in the first person view. If the field of view is properly adjusted, a normal screenshot can be created. The actual picture object does not have to be exactly in the middle, because the recording is still post-processed anyway. |
||
| + | |||
| + | When recording multiple variants of an entity, it is important not to leave the camera mode during each shot, nor change the zoom. If you make the slightest change, the previous setting can not be restored. The result is that the individual recordings do not exactly fit one on top of the other, but this is used in many plug-in letters and makes the recordings useless. Entities can be easily changed with commands, such as {{cmd|data merge entity}}, without having to change anything on the camera between individual shots. |
||
| + | |||
| + | Since the recording has now been successfully done, it can be improved in an image processing program. The software used does not matter, but a download for a free program [https://www.gimp.org/ GIMP] can be found at the top right of this section. First, the sky is removed, for which the color selection tool (magic wand) is best suited. In doing so, care must be taken that all places where the sky is visible are removed. Entities such as [[skeleton]]s have many holes in their model, where there will still be individual pieces of sky. |
||
| + | |||
| + | After the background is gone, cropping is done. The width of the image should be minimal, for example, the two edges directly adjacent to the last pixel of the image object. The height should have enough scope, and this must not be cut so radically, otherwise the picture object "stick" at the upper edge. If there is nothing else to edit in the rendering, and it can be exported, and [[Special:Upload|uploaded]] in the wiki. |
||
| + | |||
| + | During image processing, it is important not to scale. As a result, only very little quality is lost and the file size increases dramatically, instead of falling. A smaller recording should be created directly with Mineshot and a smaller zoom level. In the wiki itself, the image size can also be changed very easily as a parameter during the integration. |
||
| + | |||
| + | === Animated Entities === |
||
| + | [[File:Guardian.png|right|250px|thumb|Render of a [[Guardian]] entity using ''Mineshot'']] |
||
| + | A challenge when creating renders is to create entities whose model has a permanent animation. For example, in the case of [[silverfish]], the body of which is continually moving, and also in [[guardian]]s, whose spines are moving, and which constantly causes a swimming movement with its tail. A start to creating a representation of these creatures would be, of course, just to press the trigger at the right moment, but that is too unreliable and the absolutely right moment to catch is almost impossible. |
||
| + | |||
| + | At this point, it might be advisable to switch to a 3D graphics software, but as already described, certain difficulties occur. The solution approach is therefore to prevent animation of the entity. It is unfortunately not possible, even with commands or the data tag <code>NoAI</code>, now one has to really make the model. The models of entities can unfortunately not be controlled by resource packages, which makes this project a bit more difficult. Mods such as [https://optifine.net/home ''OptiFine''] or [https://github.com/kvverti/enim/releases ENIM] have this function, but the effort to create a complete model without the animation is just too big. |
||
| + | |||
| + | Instead, the model can be modified in the program code. This of course requires knowledge of the programming language of ''Minecraft'' called "Java" and a certain experience with the program code of the game. A work with the [[Programs and editors/Mod Coder Pack|Mod Coder Pack]], where the code could be changed directly, is still unfortunately not possible, since the required mod ''Mineshot'' can not be loaded since this requires [[Mods/Forge|Minecraft Forge]]. It must be in a programming environment with Minecraft Forge. The code and the model can not be edited directly, but Forge offers enough possibilities to easily overwrite an existing model. This works best through <code>renderingRegistry</code> using <code>registerEntityRenderingHandler</code>. |
||
| + | |||
| + | The actual recording is still in-game, and the steps are already described in the previous section. |
||
| + | |||
| + | == 3D Items == |
||
| + | The Minecraft Wiki does not use images of 3D items. However, some blocks and entities (such as Item Frames and weapons held by Mobs) may be rendered together with 3D rendered items. |
||
| + | |||
| + | If you want those models, create a 16x16 split sheet of geometry, map the item's texture to it, and then extrude and generate it.<br> |
||
| + | There is also this generator that creates item models in OBJ/MTL format from textures. [https://codepen.io/pneuma01/full/mdepbjx CodePen - Minecraft 3D Item OBJ/MTL Generator] |
||
| + | |||
| + | == Structures == |
||
| + | {| class="wikitable" style="float:right;text-align:center;margin:0" |
||
| + | |'''Downloads''' |
||
| + | [https://github.com/ata4/mineshot/releases Mineshot]<br>[http://www.mcedit.net/downloads.html MCEdit]<br>[https://www.gimp.org/downloads/ GIMP] |
||
| + | |} |
||
| + | [[File:StrongholdPortalRoom.png|right|250px|thumb|Render of the [[end portal]] room in [[stronghold]] using ''Mineshot'']] |
||
| + | The recording of a scene differs only slightly from the recording of an entity, and only a few more things are to be considered. A 3D graphics software is again not recommended, since in this case too, the process is complex. Again the [[mod]] ''Mineshot'' of [[User:BarracudaATA|BarracudaATA]] is best suited, but it can be done in vanilla by setting the {{cd|fov}} value in [[options.txt]] to -1.75 and moving far away from the subject. |
||
| + | |||
| + | In the case of structure, the main thing is to move all the related blocks to a suitable location. For example, the recording can only take place in [[the Overworld]], since there is lack of sunlight and lighting in [[the Nether]] and [[end]]. If a shot of a [[Nether Fortress]] or another Nether structure is to be made, it must be transferred to the Overworld. Creating the structure block by block would be difficult, so [[structure block]]s or an external editing software like ''MCEdit'' makes it easier to do the task, in which the download link can be found at the right side of the page. |
||
| + | |||
| + | If the structure is already in the Overworld, changes are still to be made in most cases. A suitable environment must be created. Structures such as [[abandoned mineshaft]]s or [[dungeon]]s should not be left underground but shifted to the sky so that they can be illuminated by the sunlight. The command {{cmd|clone}} is extremely useful for this, which means that an external software is no longer needed in this case. But even structures directly on the ground should be shifted to the sky. As described in the previous section, the sky is an excellent background because of its low color spectrum, since the later transparency can be put without any problems. If the structure was moved high enough, the ground is not visible, which simplifies post-processing. |
||
| + | |||
| + | You must also pay attention to the orientation of the scene. As already described, the view direction for the wiki always points to the northwest. The scene should be aligned accordingly. If this is not the case, it is possible for small block [[structure]]s to rotate them with the help of a [[structure block]]. For larger structures, it would be easier to use an external editing software like ''MCEdit''. |
||
| + | |||
| + | If the entire structure is now in the desired location, it must be prepared for recording. This is especially important for enclosed spaces whose contents should be visible. For example, the ceiling and two walls are removed, namely the two walls that are closest to the viewer. It is absolutely not necessary to remove all the components of the respective wall, for example, an entrance in one of the walls, it is advisable to preserve it, including the border of blocks. A concrete example of opening such a space can be found on the right side. |
||
| + | |||
| + | Since the structure is prepared, only the position of the player needs to be prepared. It is important to remember that the ''Mineshot'' camera is centered on the player, but it will not be visible. If the player is visible in the scene, you should switch to first person view. While the actual position of the player within the scene is not important, it is only important that the entire scene is depicted, but certain [[block]]s such as [[chest]]s and [[head]]s are only displayed as long as the player is within a radius of 64 blocks. Also, [[particles]] are only visible at a maximum distance from the player of 32 blocks. |
||
| + | |||
| + | To start recording, a special camera mode is switched on in ''Mineshot''. This is done by pressing the default key {{key|NUMPAD5}}, which can be zoomed in and out by pressing {{key|ADD}} and {{key|SUBTRACT}} respectively, both of which can be found at the number keypad. Do not change the angle of the camera. The default values (45° and 60°) correspond exactly to the values required for the standard view. |
||
| + | |||
| + | Since the recording has now been successfully done, it can be improved in an image processing program. The software used does not matter, but a download for a free program [https://www.gimp.org/ GIMP] can be found at the top right of this section. First, the sky is removed, for which the color selection tool (magic wand) is best suited. In doing so, care must be taken that all places where the sky is visible are removed. Structures with [[iron bars]] have many holes, where there will still be individual pieces of sky. |
||
| + | |||
| + | After the background is gone, cropping is done. The width of the image should be minimal, for example, the two edges directly adjacent to the last pixel of the image object. The height should have enough scope, and this must not be cut so radically, otherwise the picture object "stick" at the upper edge. If there is nothing else to edit in the rendering, and it can be exported, and [[Special:Upload|uploaded]] in the wiki. |
||
| + | |||
| + | During image processing, it is important not to scale. As a result, only very little quality is lost and the file size increases dramatically, instead of falling. A smaller recording should be created directly with ''Mineshot'' and a smaller zoom level. In the wiki itself, the image size can also be changed very easily as a parameter during the integration. |
||
| + | |||
| + | == Optimization == |
||
| + | {| class="wikitable" style="float:right;text-align:center;margin:0" |
||
| + | |'''Downloads''' |
||
| + | {| |
||
| + | |{{OS|Win}}||[http://advsys.net/ken/utils.htm PNGOUT] |
||
| + | |- |
||
| + | |{{OS|Mac|Linux}}||[http://www.jonof.id.au/kenutils PNGOUT] |
||
| + | |} |
||
| + | |} |
||
| + | Since the images always contain many transparent areas and a small color spectrum, it is worth compressing the files. In addition to the obvious effect of saving space, the smaller size also helps in viewing the image in the browser because it is loaded with less data from the wiki server. |
||
| + | |||
| + | Subsequent scaling of a representation is not a good solution for reducing the file size, and it produces a contrary effect. This is because, in almost all scaling modes, an interpolation is used with edge smoothing. This greatly expands the color spectrum and the file size increases correspondingly. In addition, the quality of the ''Minecraft'' textures, which are already low-resolution, is often lost. |
||
| + | |||
| + | Instead, it is recommended to use lossless compression. The [http://advsys.net/ken/utils.htm PNGOUT] application, which is compatible for Windows, macOS, and Linux, is available for this purpose. Depending on the image, only 80% to 20% of the original file size remain after the compression without the changes being visible on the image. It can be downloaded on the right side of the page for the respective operating system. |
||
| + | |||
| + | On Windows, ''PNGOUT'' can be used as a graphical user interface. PNG files needed to be compressed are to be selected and the program will compress them. Under macOS and Linux, PNGOUT can only be used via the [[wikipedia:Terminal|Terminal]]. It is recommended to use a script as well as under Windows to process several images automatically. On Windows, ''PNGOUT'' can also be accessed using the [[wikipedia:Command Prompt|command prompt]] and automated with a script. |
||
| + | --> |
||
{{Руководства}} |
{{Руководства}} |
||
Версия от 21:01, 8 августа 2020
| Эту статью нужно срочно переписать!
Вы можете помочь, исправив и дополнив еë.
|
| Эту статью нужно срочно оформить!
Вы можете помочь, отредактировав её.
|
Рендер гранита, выполненного через Blender
Вики в основном использует специальные "стандартизированные виды" соответствующего игрового элемента в виде изображений, которые можно найти в правой части страницы. Эти стандартизированные представления являются аксонометрия представлениями с приблизительно изометрическим углом обзора (за исключением крестообразных моделей), а также используются для инвентарной формы блоков в игре. Эти представления являются не простыми скриншотами, а специальными рендерами. В большинстве случаев игровой элемент импортируется в трёхмерном программном обеспечении или воспроизводится там, чтобы затем иметь возможность создать снимок со специального ракурса. Для поддержания прозрачности используется только формат изображений PNG.
Создание стандартизированных представлений непосредственно в игре невозможно. Специальный угол обзора может быть достигнут параметрами поворота и наклона головы с помощью команды /teleport @s ~ ~ ~ 135 30, но искажение перспективы, вызванное полем зрения, препятствует идеальному стандартизированному виду. Даже при минимальном значении поле зрения все равно вызывает небольшое искажение. Стандартизированные представления можно создать с помощью игры, изменив значение fov в options.txt до -1.7 или ниже и двигаться далеко от объекта, но когда объект является блоком или сущностью, он может выйти за пределы расстояния рендеринга. В фазе игры Indev можно было создавать изометрические скриншоты из игрового мира, но эта функция была удалена.
Эта статья содержит инструкции по созданию стандартных представлений, используемых в wiki. Инструкции описывают только один способ создания нужного вида. Отдельные авторы могут работать по-разному. Любое загружаемое программное обеспечение доступно бесплатно, и обращение с платными альтернативами может быть проще и удобнее.
Для видов используется только приблизительно изометрический угол. Изометрическая аксонометрия стандартизирована, и точный угол обзора составляет 45° и arctan (√2) (≈54.7356°). Однако для представлений в wiki используется угол обзора 45° и 60°.
Подготовка
| Скачать модель блока Для Blender 2.79 single300px.blend multi300px.blend Для Blender 2.8+ single_300px.blend single_transparent300px.blend |
Нам понадобятся:
Теперь нужно установить Blender. После установки поместите текстуру блока на Рабочий стол, так будет удобнее достать её из проводника Blender. Все, подготовка закончена.
Работа в Blender
Открываем скачанный файл и видим это:
Файл:BlenderTutorial (1).png
В правой части экрана есть панель, где находится список элементов: World, Camera, Sun, left, right, top.
left, right и top — это, соответственно, стороны блока. По умолчанию они имеют общую текстуру. Для того, чтобы её сменить, выделим, например, left (клик на него) и ниже в панели вкладок-кнопок выберем иконку, напоминающую шахматную доску. Пролистаем появившееся параметры вниз, и увидим строку «C:\Users\Admin\Pictures\Divine\руда\реалмит текстура.png». Это путь к нашей текстуре. Кликаем справа от строки на иконку папки.
Файл:BlenderTutorial (2).png
Откроется браузер файлов. Справа можно попасть в Локальные диски, на Рабочий стол (вот зачем текстуру туда скидывать) и в другие места. Ищем тестуру, выделяем и жмем Enter.
Файл:BlenderTutorial (3).png
Возможно, вы увидите, что на кубике в главном окне теперь есть мыльная текстура, возможно, что не увидите.
Файл:BlenderTutorial (4).png
Теперь нажимаем F12 и видим следующее:
Файл:BlenderTutorial (5).png
Это превью нашей отрендеренной картинки. Оно никуда не сохранилось, это нужно проделать вручную. Для этого жмем F3. Открывается браузер. Уже знакомым способом ищем нужный путь для сохранения, и меняем вверху untitled.png на желаемое имя. Нажимаем Save as Image. Все! Теперь в указанной папке лежит картинка 150x150 с изображением вашего блока.
Файл:BlenderTutorial (6).png
.png)
.png)
.png)
.png)
.png)
.png)
Разные стороны у блоков
Сначала выполните весь изложенный выше туториал шаг за шагом.
Чтобы наложить разные текстуры на разные стороны, нужно создать несколько текстур. Нужно выбрать сторону (top, left или right), к которой приложится новая текстура.
Создание текстуры
Нужно зайти на вкладку текстур. Там будет список всех текстур в сцене, пока что она одна (Texture.001).
Чтобы создать новую текстуру, надо кликнуть по первой пустой полоске после имени единственной текстуры Texture.001. Под списком текстур нажимаем на кнопку «New», в списке ниже напротив слова «Type» выбираем «Image or Movie».
Листаем ниже, пока не найдём группу «Image». Нажимаем на кнопку «Open» рядом с кнопкой «New», ищем нужную картинку.
Устранение размытия
Ищем группу «Image Sampling» и убираем галочку с «Interpolation», в списке «Filter» выбираем «FEELINE».
Результат
Всё, текстура готова и успешно наложена. Результат действий можно увидеть, нажав F12 (рендер картинки).
Разрешение и сглаживание
Описанного выше вполне хватит, чтобы сделать приличную картинку. Но, например, иногда нужно сделать Grid-изображение блока в разрешении 32 на 32, или включить сглаживание, чтобы не было «лесенок» по краям блока (на английской MWiki все картинки блоков отрендерены со сглаживанием). Для этого нужно зайти в настройки сцены, или рендера. Для этого в той же панельке, где мы выбирали параметры текстур (шахматную иконку) кликаем на первую иконку — фотоаппарат. Внизу отобразятся настройки рендера.
Разрешение
В группе Dimesions под надписью Resolution находятся два параметра: X и Y, которые задают ширину и высоту отрендеренной картинки. Например, чтобы сделать Grid-версию блока, нужно выставить 32 на 32.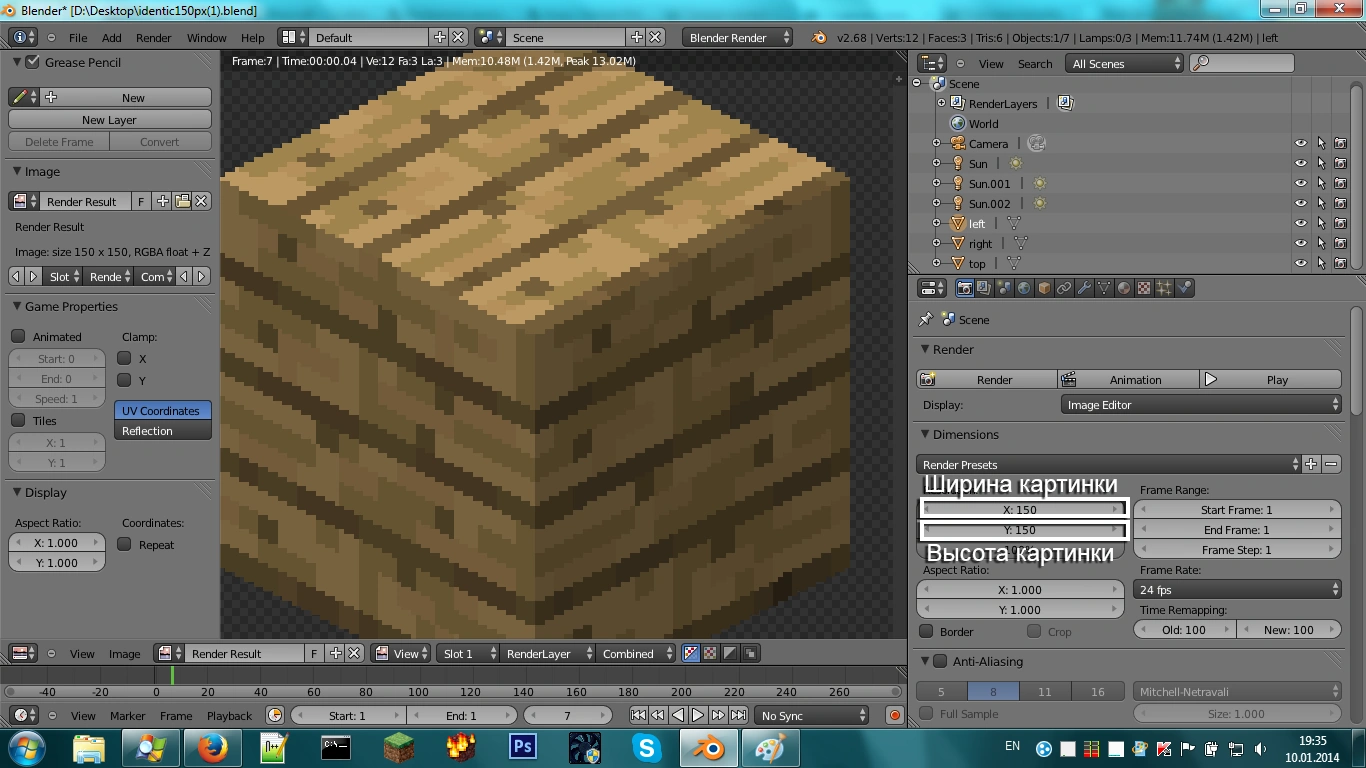
Сглаживание
Пролистав ниже, увидим группу Anti-aliasing. Чтобы включить сглаживание, ставим галочку перед надписью Anti-aliasing. Ниже можно выбрать качество сглаживания (5, 8, 11 или 16). Я выбираю 8. А дальше все, как обычно — F12 — F3 — сохраняем результат.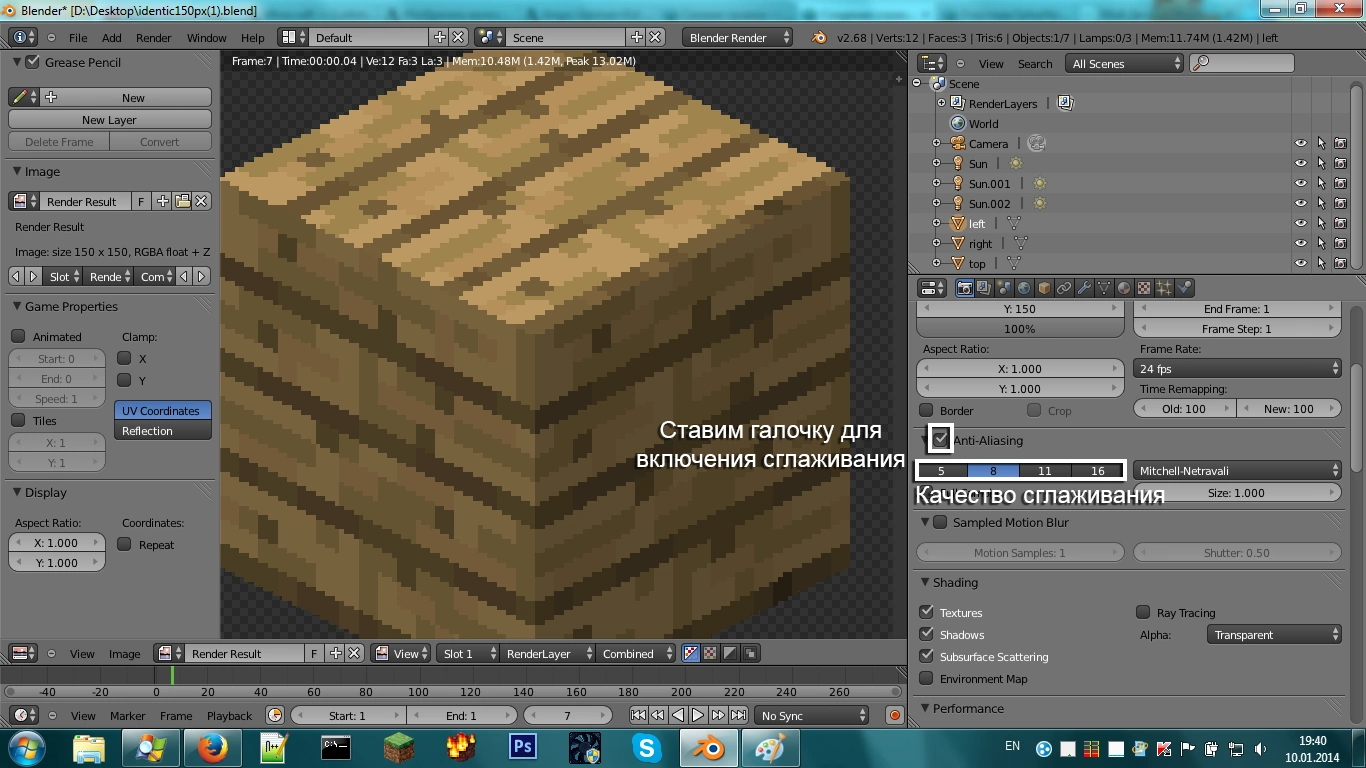
| Правовые вопросы | |||
|---|---|---|---|
| Правила | |||
| Группы участников |
| ||
| Редактирование | |||
| Прочее | |||